GAT-EXTENDER

GAT-EXTENDER

Home » Archives for Anthony Garza

GPOE-EXTENDER INSTALLATION MANUAL

Welcome to the PoE Texas Manual for the Extender Line of Products!

The purpose of the manual is to help you quickly and effectively navigate the installation and functions of your new Power Over Ethernet Extender.

Our goal is to make our products as intuitive and simple to use as possible, so we value your feedback and questions directly to us at success@poetexas.com.  Phone +1-512-479-0317.

Or you’re always welcome to leave questions or comments on our product page: GAT-Extender

If you’d like to learn more about our extender line to extend multiple devices on one network cable, check out these products: GBT-4-IW and GBT-4-60W.

What’s Inside

PARTS LIST: GAT-EXTENDER

  • 1 X Extender
  • 2 X IP67 glands [required use for proper install]

Key Features:

  • IEEE 802.3at and af compatible
  • 10/100/1000 Mbps Data Rate
  • IP67 rated for outdoor use; water resitant- DO NOT submerge in water [not water proof]

General Installation

Your new GAT-Extender is designed to be simple to install and set up. This unit is designed for indoor and outdoor use. If using outdoors, the unit is water resistant but not water proof, meaning the unit can withstand rain and snow but do NOT submerge the GAT-Extender in water or other liquids.

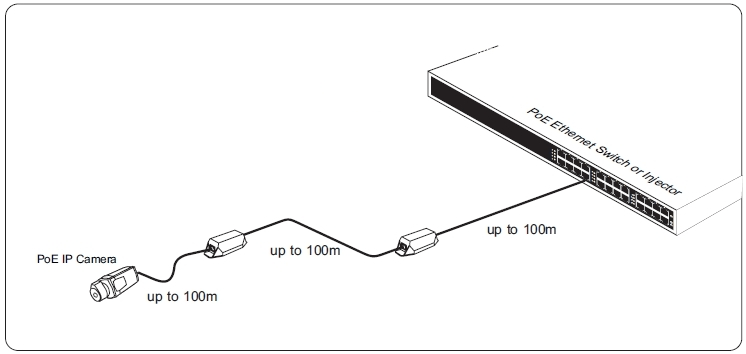
To install your GAT-Extender, place the extender inline after your PoE switch or injector (PSE) within a 100m (300 ft) distance from the PSE.  Using a second category cable to run to a second GAT-Extender or to your powered device within 100m. Please see the diagram below for distance placement.

To properly install the GAT-Extender the IP67 Glands MUST be used on the input and output side of the extender. Use scissors to cut through the gland and wrap the gland around the base of the category cable. Insert the gland into the GAT-Extender and cover with the metal protector by screwing on. This will assure your extender stays water resistant. For more detail on the install, please watch our youtube video below. Failure to properly install the glands with outdoor usage will lead to water leaks, voiding the warranty on the unit.

CONFIGURATION

There is no configuration necessary with this device.  Simply plug it in and follow the installation instructions.

OR Call a PoE expert for assistance +1(512)479-0317

Technical Specifications

Product Specifications

Certifications IEEE 802.3af (PoE), IEEE 802.3at (PoE+), RoHS Compliant
Data + PoE Ports 2
Data Rate 10/100/1000
Dimensions 209 mm x 53 mm x 37.5 mm
IP Rating IP67
Load Regulation
Max Power for Kit 30 Watts
Max. Amps Per Port 1.1Amp
Mount Type in-line
Operating Humidity 20%-80% Non-Condensing
Operating Temperature Range -40 to 65 C
Output Voltage 55v (Typical)
PoE Mode/Pinout Mode A
PoE Standard IEEE 802.3at
PoE Standards Supported IEEE 802.3af/at
Power Input 44 – 57 volts POE
Storage Temperature -40 to 85 C
Weight .80 lbs

If you find this learning center helpful, like and subscribe on your social channels to learn when we post new guides!

WTS-124A Mount

WTS-124A Mount

Home » Archives for Anthony Garza

iPad Wall Mount Plus PoE Power Kits

Welcome to the PoE Texas Manual for the WTS-124A-SL and WTS-124A-BK, aluminum Wall mounts for the iPad 10th generation model.  You can now have a surface mounted iPad enclosure with a single cable and no holes in your wall!

The purpose of the manual is to help you quickly and effectively navigate the installation and functions of your new iPad mount kit.

Our goal is to make our products as intuitive and simple to use as possible, so we value your feedback and questions directly to us at service@poetexas.com.  Phone +1-512-479-0317.

Or you’re always welcome to leave questions or comments on our product page: WTS-124A-BK, WTS-124A-SL, AC-124A-BK-WM, AC-124A-SL-WM, AC-124A-BK, AC-124A-SL, AF-124A-BK-PD-WM, AF-124A-SL-PD-WM, .

What’s Inside

WTS-124A-BK

PARTS LIST:

  • 1 X iPAD WALL MOUNT
  • 4 X WALL ANCHORS
  • 1 X TOOLS

Additional tools and supplies you’ll want to make sure you have are:

  • Drill and 3/8″ drill bit
  • Category Cable wiring tools or some device to strip the shielding off the CAT cable at the tablet end
  • Laser or bubble level
  • Marker or pencil
  • Oh, and don’t forget your iPad!

    WTS-124A-BK and Mullion Mount (Glass and Wall Mount)

    PARTS LIST:

    • 1 X iPAD WALL MOUNT
    • 4 X WALL ANCHORS
    • 1 X TOOLS

    Additional tools and supplies you’ll want to make sure you have are:

    • Drill and 3/8″ drill bit
    • Category Cable wiring tools or some device to strip the shielding off the CAT cable at the tablet end
    • Laser or bubble level
    • Marker or pencil
    • Oh, and don’t forget your iPad!

      WTS-124A-BK and AC-USBC (AC Adapter Kit)

      PARTS LIST:

      • 1 X iPAD WALL MOUNT
      • 4 X WALL ANCHORS
      • 1 X TOOLS
      • 1 X AC-USBC

      Additional tools and supplies you’ll want to make sure you have are:

      • Drill and 3/8″ drill bit
      • Category Cable wiring tools or some device to strip the shielding off the CAT cable at the tablet end
      • Laser or bubble level
      • Marker or pencil
      • Oh, and don’t forget your iPad!

        WTS-124A-BK and AF-USBC-PD (AC Adapter Kit)

        PARTS LIST:

        • 1 X iPAD WALL MOUNT
        • 4 X WALL ANCHORS
        • 1 X TOOLS
        • 1 X AF-USBC-PD
        • 1 X USBC Coupler

        Additional tools and supplies you’ll want to make sure you have are:

        • Drill and 3/8″ drill bit
        • Category Cable wiring tools or some device to strip the shielding off the CAT cable at the tablet end
        • Laser or bubble level
        • Marker or pencil
        • Oh, and don’t forget your iPad!

          WTS-124A-BK and AF-USBC-JB (PoE Adapter Kit)

          PARTS LIST:

          • 1 X iPAD WALL MOUNT
          • 4 X WALL ANCHORS
          • 1 X TOOLS
          • 1 X AF-USBC-JB

          Additional tools and supplies you’ll want to make sure you have are:

          • Drill and 3/8″ drill bit
          • Category Cable wiring tools or some device to strip the shielding off the CAT cable at the tablet end
          • Laser or bubble level
          • Marker or pencil
          • Oh, and don’t forget your iPad!

            WTS-124A-BK and GAT-USBC-PD-V3 (PoE Adapter Kit)

            PARTS LIST:

            • 1 X iPAD WALL MOUNT
            • 4 X WALL ANCHORS
            • 1 X TOOLS
            • 1 X GAT-USBC-PD-V3

            Additional tools and supplies you’ll want to make sure you have are:

            • Drill and 3/8″ drill bit
            • Category Cable wiring tools or some device to strip the shielding off the CAT cable at the tablet end
            • Laser or bubble level
            • Marker or pencil
            • Oh, and don’t forget your iPad!

              WTS-124A-SL

              PARTS LIST:

              • 1 X iPAD WALL MOUNT
              • 4 X WALL ANCHORS
              • 1 X TOOLS

              Additional tools and supplies you’ll want to make sure you have are:

              • Drill and 3/8″ drill bit
              • Category Cable wiring tools or some device to strip the shielding off the CAT cable at the tablet end
              • Laser or bubble level
              • Marker or pencil
              • Oh, and don’t forget your iPad!

                WTS-124A-SL and Mullion Mount (Glass and Wall Mount)

                PARTS LIST:

                • 1 X iPAD WALL MOUNT
                • 4 X WALL ANCHORS
                • 1 X TOOLS

                Additional tools and supplies you’ll want to make sure you have are:

                • Drill and 3/8″ drill bit
                • Category Cable wiring tools or some device to strip the shielding off the CAT cable at the tablet end
                • Laser or bubble level
                • Marker or pencil
                • Oh, and don’t forget your iPad!

                  WTS-124A-SL and Wall Mount (Wall Mount)

                  PARTS LIST:

                  • 1 X iPAD WALL MOUNT
                  • 4 X WALL ANCHORS
                  • 1 X TOOLS

                  Additional tools and supplies you’ll want to make sure you have are:

                  • Drill and 3/8″ drill bit
                  • Category Cable wiring tools or some device to strip the shielding off the CAT cable at the tablet end
                  • Laser or bubble level
                  • Marker or pencil
                  • Oh, and don’t forget your iPad!

                    WTS-124A-SL and AC-USBC (AC adapter Kit)

                    PARTS LIST:

                    • 1 X iPAD WALL MOUNT
                    • 4 X WALL ANCHORS
                    • 1 X TOOLS

                    Additional tools and supplies you’ll want to make sure you have are:

                    • Drill and 3/8″ drill bit
                    • Category Cable wiring tools or some device to strip the shielding off the CAT cable at the tablet end
                    • Laser or bubble level
                    • Marker or pencil
                    • Oh, and don’t forget your iPad!

                      WTS-124A-SL and AF-USBC-JB (IEEE 802.3af POE adapter kit)

                      PARTS LIST:

                      • 1 X iPAD WALL MOUNT
                      • 4 X WALL ANCHORS
                      • 1 X TOOLS
                      • 1 X AF-USBC-JB

                      Additional tools and supplies you’ll want to make sure you have are:

                      • Drill and 3/8″ drill bit
                      • Category Cable wiring tools or some device to strip the shielding off the CAT cable at the tablet end
                      • Laser or bubble level
                      • Marker or pencil
                      • Oh, and don’t forget your iPad!

                        General Installation

                        This fix-wall mount stand is designed specifically for the iPad 10th Gen and features an integrated light indicator component that pairs with our DASH App which you can install at this link. The minimalist design conceals the light display inside the stand, which illuminates with different colors to correspond with various software functions on the tablet.

                        Since you’re using 24 volt passive PoE, please connect the wires to the iPAD mount prior to plugging in the RJ-45 into the injector or converter.

                        Installation Steps

                        1) Route PoE compatible Ethernet cable to desired drop site.
                        2) Cut and install wall gang box specific for your POE adapter. Double gang box will fit most adapters while the single gang box fits our AF-USBC-JB.
                        3) Route Cable through wall gang box.
                        4) Mount the desired plate using either the drywall anchor screws provided or mounting directly the the Gang Box, (Flush Wall Mount, Angle Wall Mount, Glass Mullion Mount). If Flush mounting, ensure PoE cable and USB-C cable are manageable and no kinks are damaging internal cabling.
                        5) Once Wall Mount or Glass mount is in place, attach the iPad mount to the front of the wall mount plate and connect to your device.

                        Connecting to Dash App LED

                        1) Go to Settings Icon
                        2) Click on the Integrations Tab
                        3) Select Scan and Choose your device.
                        4) You’re ready to start scheduling.

                        CONFIGURATION

                        TROUBLESHOOTING

                        The iPAD Wall Mount is designed to function right out of the box with all the parts necessary to do so.  However, if you are having an issue, here are a couple things to check:

                        1 – Are you using a 24 volt passive PoE power source?  A Cisco or other IEEE 802.3af or at switch will not power on the mount.

                        2 – Are the connectors on the iPad mount secure pressed down?  And when you gently tug on the wires to they come out by themselves?.

                        3 – The wiring diagram is for a straight through cable with blue white/blue and brown white/brown connected to pins 4/5 and 7/8 respectively.  If your wire is connected up differently than this diagram, please contact us.

                        You can also check out our warranty,  including the free optional extended warranty, and returns on these pages:

                        WARRANTY AND RETURNS

                        Technical Specifications

                        Product Specifications

                        Compatible devices iPad 10th Gen only
                        Dimensions 268 x 184 x 12.7 mm
                        Color Silver and Black
                        Cable Type USBC
                        Material Aluminium Alloy
                        Lights RGB LED
                        Data Rate 10/100 mbps
                        Efficiency 90%
                        Input Voltage Range AC Adapter: 100 – 200V, PoE Adapter 48V – 56V
                        Max Power for Kit 15 – 25W Depending on kit selected
                        Mount Type Wall and Mullion Mount
                        Operating Humidity 5% to 90%
                        Operating Temperature Range -10 – 60C
                        PoE Method POE-Kit: IEEE 802.3af GAT-Kit: IEEE 802.3af and IEEE 802.3at
                        PoE Mode/Pinout GAT-Kit: Mode A/B

                        If you find this learning center helpful, like and subscribe on your social channels to learn when we post new guides!

                        GBT-USBC-PD

                        GBT-USBC-PD

                        Home » Archives for Anthony Garza

                        GBT-USBC-PD

                        IEEE 802.3bt To USB-C 3.0 (Gigabit Data Rate)

                        Welcome to the PoE Texas Manual for the patented GBT-USBC-PD  (designed for iPad, Microsoft Surface, and Samsung) that delivers wired Power and Gigabit Data for your USB Type C devices!

                        The purpose of the manual is to help you quickly and effectively navigate the installation and functions of your new Power Over Ethernet Converter.

                        Our goal is to make our products as intuitive and simple to use as possible, so we value your feedback and questions directly to us at service@poetexas.com.  Phone +1-512-479-0317.

                        Or you’re always welcome to leave questions or comments on our product page: GBT-USBC-PD

                        What’s Inside

                        PARTS LIST:

                        • 1 X POE++ Converter 

                        GENERAL INSTALLATION


                        Your new PoE converter is designed to be simple to install and set up.  It is small and light enough to leave “inline” with your network cable.

                        You may also choose to use four Keystone 616 mounting brackets to wall mount the device.

                        Otherwise, the GBT-USBC-PD fits all dual gang wall boxes.

                        Once it is in place, simply follow these steps in order:

                        1 – Plug the RJ-45 end into an IEEE 802.3bt PoE (POE++) or 48-56 volt passive Power Sourcing Equipment (PSE) with a data source

                        2 – Ensure the device you’re connecting to is on and logged in

                        3 – Plug the USB-C connector into the device

                        The converter will automatically set up the network connection with your device and begin charging.  To confirm that, go to the General settings tab or look for the <…> symbol next to Ethernet.

                        CONFIGURATION

                        Configuring Your Cisco Enterprise POE Switch for 2 Event PoE Classification

                        Yeah, I know that’s a mouthful.  Here’s the simple translation.  Cisco enterprise switches including the 9400 and 9300 models, which is a lot of them, come with a default setting that makes them less compatible PoE+ devices like the GBT-USBC-PD.   You’ll know the setting isn’t right because our device won’t power on correctly, and your device won’t charge.  How frustrating!

                        It’s a simple enough fix.  You simply need to configure the ports that will power the GBT-USBC-PD to have 2 event classification.  You can find the Cisco documentation on how to do that here: CONFIGURE MY SWITCH

                        Or here are the steps you take after you’ve logged into the terminal. 

                        Switch> enable
                        Switch# configure terminal
                        Switch(config)# interface gigabitethernet2/0/1

                        Switch(config-if)# power inline port 2-event
                        Switch(config-if)# end

                        You can still set up your iPad to not automatically lock on a timer.  When the screen locks if you would like the screen always on.

                        • Go to the Settings icon on your iPad
                        • Select Display & Brightness
                        • Select Auto Lock
                        • Set the limit to Never


                        The splitter will auto-configure the IP settings to default as soon as you connect it up including Dynamic IP addressing.

                        1. Navigate to General Settings, then you’ll see a symbol for the LAN <…>
                        2. Select this and you’ll see the option for PoE Texas LAN, select it

                        You’ll see your IPV4 IP address information.  If it shows “Automatic”, that means your getting a dynamically assigned IP address.

                        If you’d like to reconfigure the IP address, DNS, and HTTP Proxy settings, you can do that by selecting these options.  

                        The most used option will be fixing your IP address by selecting the “Automatic” button.

                        For the other networks settings, we’d recommend talking to a service provider or give us a call: 512-479-0317 or service@poetexas.com.

                        Best Practices for iOS Updates

                        Despite Apple’s excellent reputation for ensuring backward compatibility with their iPads and iPhones, practical experience with a recent iOS update has revealed that even they can miss things which can temporarily lead to disruption of service for your device.   If your device must be reliable 24/7, we recommend these following best practices:

                        • Go to Settings -> General -> Software Updates -> Automatic Updates
                        • Deselect “Install iPadOS Updates”
                        • Before choosing to install the next update, please check into our iOS Compatibility Table to check whether we have finished testing the performance of an new iPadOS version

                        iOS Compatibility Table

                        • Finally, to get emailed live updates on iOS compatibility, subscribe to our mailing list for iOS compatibility

                        Technical Specifications

                        Product Specifications

                        Adapters included USB-C to USB-C Right Angle Bi-directional cable
                        Connector Types USB-C
                        Data Rate (Input) 10/100/1000 Gigabit / (Output) 10/100/1000 Mbps
                        Data Standard USB 3.0 (Output)
                        Input voltage 48-56V
                        LEDs Per Port Green (POE) / Yellow (USB-C)
                        Max Power for Kit 65 Watts
                        Mount Type Wall or Inline
                        Operating Humidity -10 – 60C
                        Output Voltage 5V,2.6A; 9V,1.78A; 12V,1.34A; 15V,1.37A; 20V,1.15A
                        PoE Method IEEE 802.3bt
                        PoE Standard IEEE 802.3bt
                        Weight 3 oz.

                        If you find this learning center helpful, like and subscribe on your social channels to learn when we post new guides!

                        Denton DBI Manual

                        Denton DBI Manual

                        DENTON DBI Manual

                        Save time by protecting your hardware with proper setup, installation, and app configuration.  Click here on the following link to take you to the Denton DBI Manual. You can also Download the manual here.

                        If you have any questions check out our FAQ or reach out to our Customer support team at success@poetexas.com

                        Looking for peace of mind. PoE Texas is now offering AIG product backed insurance.

                        Tired of tedious software install? Here’s our exclusive White Glove service.

                        Do you want flexible payment options? PoE Texas is now offering financing options.

                        Frequently Asked Questions

                        Where can I download or view the manual?

                        You can download the DBI Manual here. YOu can also view the flip book or download it up at the top of page.

                        What makes this plan better than others?

                        PoE Texas is offering an exclusive white glove service that simplifies the tablet deployment process when installing PoE Deployed Tablets in the field.

                        Stuck on your Project? Need Peace of Mind?

                        Reach out if you need help identifying the proper PoE solution for your business or project.

                        PoE Texas Success Team | 512-479-0317 | success@poetexas.com

                        5 + 10 =

                        MeetingPortal Manual

                        MeetingPortal Manual

                        Home » Archives for Anthony Garza

                        MeetingPortal

                        Welcome to the PoE Texas Manual for our MeetingPortal!

                        The purpose of the manual is to help you quickly and effectively navigate the creation, installation, and functions of your new MeetingPortal.

                        Our goal is to make our products as intuitive and simple to use as possible, so we value your feedback and questions directly to us at service@poetexas.com. Phone +1-512-479-0317

                        Privacy Policy

                        Do you need convenient Automation and Control?

                        Check out our ControlPortal app

                        Create the business space that seamlessly saves you money and gives you more control than traditional systems

                        Click Here

                        Prerequisites

                         EQUIPMENT REQUIRED:

                        The exact amount required depends on the project’s size

                        PoE Switch or Injector and Network Router 

                        Features

                        The app shall offer three modes with the following features:

                        Basic (Free):

                        • Allows for integration Microsoft 365, Google Workspace/Gsuite, and Android calendars
                        • Schedule Display

                        Business (Paid Subscription – No COR-TAP onsite)

                        • Room schedule display
                        • Room booking
                        • Extending and ending meetings
                        • Meeting check-in
                        • Find free rooms
                        • Custom Branding

                        Enterprise (Paid Subscription – COR-TAP onsite)

                        • All Basic features
                        • All Business features
                        • Central management
                        • MDM Deployment
                        • Web Dashboard
                        • Invoice billing
                        • Custom subscriptions

                        User Guide

                        Getting Started with MeetingPortal

                        Follow these steps to be up and running with MeetingPortal in no time. This guide will help you complete your initial set-up, and walk you through the key features and options you need to get the most out of MeetingPortal.

                        1. Connect your calendars to MeetingPortal

                        If you are using Microsoft Microsoft 365 or Google Workspace (GSuite) then you can complete all the necessary steps from within MeetingPortal. Please see our guides on Microsoft 365 Setup and Google Workspace Setup for instructions on how to set up your Microsoft 365/Google Workspace account correctly and connect it to MeetingPortal.

                        If you are using a different system to manage your meeting room calendars (for example a local Exchange server or CalDav) then you can connect your device to the service and MeetingPortal will read your meeting information from your device’s calendar. Please see the section on Using MeetingPortal with your device’s calendar in our Device Setup guide for information on how to do this.

                        2. Choose how meetings are displayed

                        MeetingPortal features a number of ways to customize the way your meeting information is displayed which can all be found in the Calendar and display section of MeetingPortal’s settings.

                        1. Rename calendars – Your meeting rooms might not always be named the way you want in your calendars. If you find this is the case, MeetingPortal allows you to rename them. Select Rename calendars, tap on the calendar you wish to rename, and enter your desired name.
                        2. Customize the meeting schedule display – By default, MeetingPortal displays your meetings in a calendar display of the current day so that you can clearly see when the meeting room is free. MeetingPortal also supports displaying upcoming meetings in a list which can be more efficient if your meeting rooms are often fully booked. Select Display meetings as, and choose a list of either today’s meetings or include up to two days of future meetings.
                        3. Display only meetings accepted by the calendar – If your meeting room calendar automatically declines new meetings that clash with existing ones (which is the case for both Microsoft 365 room mailboxes and Google Workspace resources) then turn on this option to hide declined meetings.
                        4. Time format and Language – These options control whether times are displayed in a 12 or 24 hour format, and which of the 23 supported languages is used in the main sections of the app. MeetingPortal will choose the best defaults based on your Device’s location settings, but you can override this and choose your own time format and language.

                        3. Security

                        The Security section of MeetingPortal’s settings gives you a number of controls which allow you to secure MeetingPortal’s settings from unauthorized access and to control what meeting information is displayed on MeetingPortal’s main display.

                        1. Require passcode to access settings – If you wish to protect MeetingPortal’s settings from unauthorized access, you can set a 4 digit passcode which must be entered before MeetingPortal’s settings will open. Turn on the option and enter your desired passcode twice to activate it.
                        2. Meeting Information – If you have sensitive information in the titles of your meetings, you can use the Label meetings with setting to control what is displayed. Choose from displaying the meeting’s title, the meeting’s organizer, or simply show that the room is booked without revealing the title or organizer. When turned off, the Display meeting details setting will prevent the meeting’s description and list of participants from being shown when a meeting is tapped on the main screen.

                        4. Optional Features

                        MeetingPortal offers a number of powerful features to help you manage your meeting rooms, available in the Optional features section. The ideal combination of settings will differ from organization to organization so we recommend that you trial different settings before settling on the combination that works best for you.

                        1. Ending and extending meetings – If a meeting is running longer than expected, MeetingPortal can allow users to extend it if the room is available. Conversely, if a meeting ends earlier than expected the booking can be ended early to free the room for other meetings.
                        2. Check-in – One of the largest causes of meeting room inefficiency is abandoned bookings – meetings which are booked in the room but then not attended. MeetingPortal can help to prevent these with the Check-in feature. When turned on, a Check-in button will be displayed on the main screen for each meeting. If this button is not pressed 10 minutes after the meeting was scheduled to start then the meeting will be cancelled and the room will be available for other bookings.
                        3. Room booking – MeetingPortal can also allow users to book the room directly from the screen. When the Allow booking option is turned on, users will be able to book the room if it is available. Bookings will start from the time the Book now button is pressed, and users have a choice of booking the room for 15 minutes, 30 minutes, 1 hour, or 2 hours. If the Users can set a message when booking feature is turned on, then users will be given the option to set a meeting title and message before completing their booking.
                        4. Find free rooms – If the room is currently booked, the Find free rooms feature allows users to find other free rooms in the building. When turned on, the Find free rooms option adds a button to the main screen that lists all rooms currently free. Select the rooms you want to include using the Rooms to check option and they will be displayed in the list. The list is ordered by the amount of free time, so the room with the most free time is displayed first.

                        5. Customize Branding

                        MeetingPortal allows you to choose your own background image. MeetingPortal supports any size of background image – the image chosen will be scaled so that it covers your devices display. For best results, you should create an image that exactly matches the size of your device’s display in pixels. To find the ideal background image size for your device, open the Appearance and branding section of MeetingPortal’s settings. The ideal size will be shown just underneath the option for setting the background image.

                        MeetingPortal also allows you to display a custom logo. The chosen logo will appear at the top of the main screen. The ideal image size for a custom logo is 500 x 100 pixels, however you can use an image with a different size and it will be scaled to fit. If you would like to have your logo appear in a different part of the main display you can add it to your background image instead of loading it separately.

                        MeetingPortal also allows you to customize the colors of visual elements such as buttons, text, and dialog backgrounds. For a full list of the customization options please see the Appearance and branding section of our full guide.


                        Using MeetingPortal with Office 365

                        Before connecting MeetingPortal to your Office 365 account you need to make sure that your meeting rooms are set up and managed in your Office Organization.

                        Setting up Office 365

                        The recommended procedure is to set up each of your meeting rooms as a Room and equipment Mailbox. Room and Equipment Mailboxes will appear as a resource when you are creating a meeting, and support advanced features such as automatically declining meeting invitations when there are clashes and double bookings.

                        If you do not wish to use Room and Equipment Mailboxes, it is also possible to set up each meeting room as a Shared calendar. Shared Calendars do not show up as resources when creating a meeting, and do not automatically decline bookings if there is a conflict, so using Room and Equipment Mailboxes is highly recommended.

                        By default, Office 365 labels events in resource calendars with the meeting’s organizer rather than its title. If you would like to see your meetings displayed in MeetingPortal with their title, you will need to connect to your Office 365 instance via PowerShell, and then change the default settings for your hosted Exchange server. You can find instructions in our helpful guide.

                        Choose a connection method

                        There are two methods that you can use to connect MeetingPortal to Office 365: a Personal or service account and an Enterprise application. Both offer their own advantages and tradeoffs:

                        Enterprise Application

                        An Enterprise Application allows MeetingPortal to connect to Office 365 on behalf of your entire organization. This method must be set up by a global administrator in your Office 365 organization, but offers the advantage that new room and equipment mailboxes will be automatically picked up by MeetingPortal without any further action. This method is recommended for most organizations.

                        • Works with room and equipment mailboxes only
                        • Does not require any calendar sharing to be set up
                        • MeetingPortal connects on behalf of your entire organization
                        • Must be set up by a global administrator

                        For help setting up MeetingPortal to connect to Office 365 via an enterprise application, see our online guide.

                        Personal and service accounts

                        Personal and service accounts are the most flexible way to connect MeetingPortal to Office 365. They are ideal for smaller teams, and are the only way to connect MeetingPortal if you’re using a personal Office 365 subscription. This method is recommended for small businesses and customers using MeetingPortal with a personal Office 365 subscription.

                        • Works with any type of calendar (both standard calendars, and room/equipment mailboxes)
                        • Requires calendar sharing to be set up if you want MeetingPortal to be able to see multiple meeting rooms at once
                        • Supports personal Office 365 subscriptions
                        • MeetingPortal connects as a user that you specify

                        For help setting up MeetingPortal to use a personal or service account, see our online guide.

                        Using MeetingPortal with Google Workspace (GSuite)

                        Before connecting MeetingPortal  to your Google account you need to make sure that your meeting rooms are set up and managed in your Google Workspace Organization, and that you’ve created and set up a Google account for using with MeetingPortal .

                        Setting up Google Workspace

                        The recommended way to do this is to set up each of your meeting rooms as a Resource. Resources added this way will appear under a list of “Rooms or resources” when you are creating a meeting, and support advanced features such as automatically declining meeting invitations when there are clashes and double bookings. They are also automatically shared with all user accounts in your Google organization.

                        If you do not wish to use Resources, it is also possible to set up each meeting room as a Shared calendar. Shared Calendars do not show up as resources when creating a meeting, and do not automatically decline bookings if there is a conflict. They also require you to share each calendar individually with every user who needs to book meetings in the room, so using Resources is highly recommended. 

                        Creating a Google account for MeetingPortal

                        Once you have set up your meeting rooms, you will need to choose a Google account from your organization to use with MeetingPortal (this can be either a new account or an existing one, for example MeetingPortal@yourcompany.com). Follow the steps below to give this account access to your meeting room calendars.

                        1. Open the meeting room:
                        Log into Google Calendar with an admin account for your organization. You should see all your resource calendars listed under My calendars.

                        Hover over one to see a three-dot menu appear. Click the menu and select Settings and sharing

                        2. Share the room’s calendar:
                        Scroll down until you see Share with specific people or groups and then click Add people and groups. Enter the email address of the account that you chose to use with MeetingPortal .

                        If you plan to book, extend, or end meetings from your MeetingPortal display, select the Make changes to events permission and click Send. If you plan to use MeetingPortal as a read-only display then you can select See all event details instead.

                        3. Accept the share request:
                        Log into Gmail with the account you created for MeetingPortal. You should see a share notification email with a subject like XXX has shared a calendar with you.

                        Open the email and click the Add this calendar link. This will add the meeting room to the account’s list of calendars. 


                        You can also use a free Gmail account instead of a Google account in your organization. By default, Google only lets you share resource calendars with the See all event details permission (which won’t let you book meetings from MeetingPortal) but you can change this in the Google Workspace Admin console.

                        Just go to Apps > Google Workspace > Calendar > General settings > External sharing options for secondary calendars and select Share all information, and outsiders can change calendars

                        Connecting MeetingPortal to your Google account

                        Once you have set up your Google account, you can connect it to MeetingPortal. Open MeetingPortal and go to Settings (the cog icon in the bottom right of the main display). If you haven’t previously connect MeetingPortal to any calendars, you’ll see a Connect button, or if MeetingPortal is already connected to a calendar you’ll see a Change button. Click Connect or Change.

                        You should see a list of calendar services to choose from (Microsoft 365, Google, and your device calendar). Select Google Workspace/GSuite and you will be asked to sign in. You should then see a screen asking permission to grant MeetingPortal access to your account. MeetingPortal will request the following permissions:

                        • View a list of your calendars – This is necessary in order to allow you to choose the calendar(s) you want to use with MeetingPortal.
                        • Read and write access to your calendars – This allows MeetingPortal to read meeting information from your calendars, and also allows you to use MeetingPortal’s advanced features such as booking a room from the display and automatically cancelling abandoned meetings.

                        MeetingPortal will not be given any further access to your Google account, and will only be able to read the information listed above. Once you have granted MeetingPortal permission to access your account, check out our Quick start guide for more information on how to get started with MeetingPortal.

                        Locking your device

                        The following settings can be used to lock your device to stop people from closing MeetingPortal and accessing other apps. When enabled, users will have to enter a pin code before they can close MeetingPortal.

                        Screen pinning (Android devices)

                        Screen pinning is an optional feature on android devices running version 5.0 (Lollipop) or later that restricts users to using only a single application. It can be used to prevent users from closing MeetingPortal (for example if your meeting room screen is in a public place).

                        To learn more about screen pinning and how to enable it for your device, visit the Google support page on the topic. Once you have set up Screen pinning, open MeetingPortal and activate Screen pinning from the Android Overview view (see the above Google documentation for further instructions).

                        Using MeetingPortal with your device’s calendar

                        If you are not using Microsoft 365 or Google Workspace, then you can connect your device directly to any calendar provider that it supports and MeetingPortal will display the meeting information.

                        Adding calendars to your Android device

                        Go to the Settings app on your phone or tablet, and go to Accounts. Click Add account and select the type of account you would like to add. For some services not natively supported by your device (e.g. for CalDav) you will need to install a separate app that functions as a ‘sync adapter’ in order to see your service in this list. Once you have selected your service, follow the instructions on screen to enter your credentials and add your account to your device.

                        Once your account has been added to your device, go to Account sync. You will have a choice of what information to sync between your account and your device (for example Mail, Contacts, and Calendars). It is recommended to turn off everything except Calendar to speed up syncing.

                        You can now select your calendar from MeetingPortal. Open MeetingPortal, go to Settings, choose the ‘Calendar’ option and select the calendar for your meeting room from the list.

                        MeetingPortal Best Practices

                        These tips will help you get the most out of MeetingPortal by making sure that you’re using your meeting rooms as efficiently as possible.

                        Always respect bookings

                        Systems work the best when everyone understands them, and everyone follows them equally. To this end, we recommend the following rules for meeting room bookings:

                        • Always make a booking when using a room even for a 15 minute impromptu meeting. This ensures that everyone in your organization knows the room is taken, and don’t come half way across the building only to find a meeting already in progress. You can reserve a room directly from the display using MeetingPortal’s Book now feature.
                        • Clear your booking if your meeting finishes early to allow everyone else to know that the room is free. You can end a meeting directly from the display using MeetingPortal’s End now feature.
                        • If you do not have a booking and someone else does, give the room up to them. This works best when followed by everyone in the company, from the C.E.O. to an intern. It encourages everyone to use the booking system (see above), and that they’ve allocated the appropriate amount of time to their meeting. For meetings that run over, you can always use MeetingPortal to extend them. If you need a meeting space that is booked, you can negotiate in advance with the booking owner to change the time or location of their booking.
                        • Use the Check-in feature to ensure that meeting bookings are adhered to. Since a meeting will be cleared if not checked-in within 10 minutes of its start time, attendees are encouraged to start the meeting on time – eliminating wasted space.

                        Different rooms for different purposes

                        Different rooms can be suitable for different purposes. For example, a large meeting will not fit in a two person room, and a two person meeting can be a waste of resources if booked in a large room. Facilities such as teleconferencing can also make a room more suitable for particular meetings.

                        It can be useful to publish information on the size and facilities offered in each meeting room in your organization, and to include a guide on the types of meetings appropriate for each one.

                        Meeting efficiency

                        Inefficient meetings can be one of the biggest productivity costs in any business. MeetingPortal can help you by making sure the space is available for you, but we also recommend considering the following tips to maximize the value you get from your meetings:

                        • Keep meetings short – A poorly structured meeting can easily run over time. While it is easy to extend a meeting with MeetingPortal it is important to think about whether it’s a good idea to.
                        • Have a clear purpose – Everyone should know why they are at a meeting, and what you hope to achieve.
                        • Prepare in advance – Meetings are best used for collaboration, so it can be helpful to send out information beforehand, and then reserve meeting time for discussion.
                        • End a meeting by listing next steps – To ensure progress from each meeting, it can be helpful to list next steps. These tasks and goals can be assigned to individuals or the team as a whole.
                        • Review who needs to attend – Meetings form a large percentage of employee’s time, which can then not be spent on their regular tasks. Consider whether each invitee needs to be present at the meeting, or whether a meeting summary or minutes might be sufficient.

                        How to Use MeetingPortal

                        The main screen

                        This is the main meeting display. From here you can see details of the current meeting, look at the day’s schedule, or make a new booking. MeetingPortals’s main screen can be shown as either a room or dashboard display.

                        See below the illustration for detailed information about each part of the display, and see the configuration section for how to select the room or dashboard display.

                        Current time – MeetingPortal takes the time of day from your device’s clock, which can be changed in your device’s settings. MeetingPortal can also display the date on the main screen.

                        Meeting room name – The name of the calendar you have selected.

                        Current/upcoming meetings – The current meeting name, duration, and number of participants is displayed. If there is another meeting starting in the next ten minutes, it is displayed below.

                        Meeting tools (optional) – These tools allow you to check-in, extend, or end a meeting early. See optional features for more information.

                        Schedule display – The schedule display shows the meeting plan for the day (or days depending on your settings). It can be configured to show a list of upcoming meetings, or a calendar view of the day. Tap on a meeting to view detailed information about the meeting. The display is colored by the meeting status (one of Free, Occupied, or Soon to be occupied).

                        Book/Book now (optional) – Allows you to make impromptu room bookings for up to two hours, or optionally also book meetings in the future. See optional features for more information.

                        Find a room (optional) – Allows you to find a free meeting room in the building. See optional features for more information.

                        Settings – Access the app settings to select a meeting room calendar, configure optional features, or customize branding.

                        MeetingPortalConfiguration

                        The following settings allow you to customize your MeetingPortal experience. Use them to choose the room calendar to display, activate and configure optional features, or control the branding and appearance of the room display. The settings screen can be accessed from the Configuration screen by tapping the cog icon on the main screen.

                        Calendar and display

                        Display mode – Choose between two display modes for MeetingPortal: A room display which shows the status of a single meeting room calendar, along with a schedule view, or a dashboard display which shows the status of multiple meeting rooms at once.

                        See the main screen overview above for an illustration of both the room and dashboard displays

                        Calendar/Calendars – Select the calendar for the meeting room you would like to display (one calendar if Display mode is set to room display, or one or more calendars if it is set to dashboard display). If you do not see your calendar in the list, make sure that it has been added to your device by following the instructions in Microsoft 365 Setup or Google Workspace Setup. *Some optional features (such as ending and extending meetings, and requiring user check-in) require write access to the calendar. These features will not be available if a read-only calendar is selected.

                        Display as – Controls how your meetings are displayed on the main screen. You have a choice of four options. A calendar view of today’s meetings shows you the entire day’s meetings, while also showing gaps between meetings. The other three options show a list of all current and future meetings, providing a more compact view.

                        Status display – Controls how the meeting room and time are shown on the main display. Choose Large room name to emphasize the room name, or choose Large clock to emphasize the current time.

                        Show date on main screen – Shows the current date on MeetingPortal’s main screen. The date format will be taken from your device’s locale settings.

                        Date format – The format of the date when shown on the main screen. “Auto” chooses an appropriate format based on your device’s locale, and the other options display the date as indicated. *Note that the exact format of the date is influenced by your selected language, so we recommend choosing your language before selecting a date format.

                        Show all-day meetings – If this option is turned on then all-day meetings will be shown on the display, and will be included when deciding if the room is free or busy.

                        Display only meetings accepted by the calendar – If this option is selected then only meetings that have been accepted by the meeting room’s calendar will be shown. This is particularly useful in eliminating double bookings, as a second booking made in an occupied timeslot will not be shown. This feature requires your calendar to automatically reject double bookings.

                        Show room occupancy by color – MeetingPortal can display different colors depending on the room’s current availability. Different colors are shown if the room is currently free, booked, or almost booked (currently free but will be booked within the next 10 minutes).

                        This option allows you to choose to have the colors displayed behind the schedule view, or in a border around the whole display. The colors for each state can be set in Appearance and branding.

                        Dim screen after hours – If this option is selected then MeetingPortal will dim the meeting room display after hours and display a screensaver showing the meeting room name and the current time. MeetingPortal will resume when the screen is tapped. The start and end time of your working hours will be visible when editing this setting. Tap on them to change them.

                        Font size – Choose the size that visual elements such as buttons and text are displayed in MeetingPortal. This setting has a larger effect on small text such as buttons and labels, and a smaller effect on larger text such as room names and headings.

                        MeetingPortal also respects your system font scaling, so if you would like to change the size of all text elements equally, you can change the text size in your device’s system settings. You can use the system font settings and MeetingPortal’s font settings at the same time for full control over the size of text in MeetingPortal.

                        Time format – Choose whether to display times in a 12-hour or 24-hour format. The default time format will be chosen based on your tablet’s locale settings.

                        Language – Choose the language used in MeetingPortal. The following languages are available in both the main display and settings areas of MeetingPortal:

                        • English
                        • Danish
                        • German
                        • Portugese (Brazil)

                        If you have any questions about the languages supported, or would like to request a translation of MeetingPortal into your language, please contact us.

                        Subscription

                        The subscription section is where you can manage your subscription to MeetingPortal Business. If you are currently subscribed, tap Manage subscription to go to the Apple App Store or Google Play Store to manage your MeetingPortal subscription. You can also upgrade or downgrade the number of devices in your subscription at any time by using the devices slider. MeetingPortal currently supports up to 10 devices for its in-app subscriptions. If you would like to use MeetingPortal on more than 10 devices, please Contact us

                        On Apple devices, if you are currently subscribed to our monthly MeetingPortal Business plan and do not see your subscription in MeetingPortal, tap Restore Purchases to make sure that MeetingPortal is showing your latest subscription information.

                        The subscription section also allows you to register your copy of MeetingPortal if you are subscribed to our MeetingPortal Enterprise plan. To do this, tap the Enterprise license button, and then enter your license key, or a pairing code obtained from our web management dashboard.

                        Security

                        Require a pass-code to access settings – If selected, you will be asked to enter a 4-digit security code. This code will be required in order to access settings from the main screen.

                        Label meetings with – This setting controls the title displayed against each meeting on the schedule display, and in the detailed information about each meeting. The following options are available:

                        • Meeting title – This is the title of the meeting, as displayed in the meeting room’s calendar.
                        • Meeting organizer – If the meeting has an organizer, then their name will be displayed (or their email address if their name is not available). Meetings with no organizer will have the title “Room booked”.
                        • No title or organizer – All meetings will have the title “Room booked”

                        Display meeting details – By default, MeetingPortal will display detailed information about a meeting when it is clicked in the schedule display. This detailed information includes:

                        • The meeting title
                        • The meeting description (including information about any video calls associated with the meeting). Displaying the meeting description is optional (see below).
                        • A list of attendees which may include email addresses

                        Disabling the meeting details option will prevent this information being displayed to users of the display.

                        Include meeting description – By default, MeetingPortal will display the meeting description when the meeting details are displayed. Disable this to show only the meeting title and attendee information.

                        Optional features

                        Require check-in – When selected, users will be required to check-in to meetings when they enter the room. This can be done by tapping a check-in button on the main screen, and must be done within ten minutes of the meeting starting. Meetings not checked-in after this time will be automatically ended.

                        The check-in feature writes a small amount of text to the calendar event’s description when the meeting is checked-in.

                        Allow booking – Allows users to book the meeting room (if its schedule allows). Choose between:

                        • Booking not allowed – When selected, users are able to book the room (if its schedule allows).
                        • Instant bookings only – The room may be booked immediately for 15 minutes, 30 minutes, one hour, or two hours.
                        • Instant and later bookings – The room may be booked immediately, and also in advance.

                        When booking is enabled, then the following options can be configured:

                        These settings apply to all bookings:

                        Suggested booking lengths – this setting affects the length of time suggested when the user is booking the room:

                        • Friendly booking end times – Booking lengths will be chosen so that your booking finishes at a round time (such as on the hour).
                        • Friendly booking lengths – Round booking lengths will be suggested (for example 30 minutes or 1 hour)

                        Include video conferencing – this setting allows you to control whether a video conference link is added to bookings made from the MeetingPortal display:

                        • Always – A video conference link is included with all bookings.
                        • Never – No video conference links are included with any bookings
                        • Per booking – MeetingPortal will ask the user at the time a booking is being made

                        Users can add attendees when booking – (only available for Microsoft 365 Enterprise Application connections). Users can add attendees (both inside and outside your organization) when booking from the MeetingPortal display. The attendees will receive a calendar invite with a videoconferencing link.

                        These settings appear twice, and can be set separately for instant and later bookings:

                        Users can set a message when booking – When selected, users are able to set their own meeting title and description when making impromptu bookings. When set to Optional, a default meeting title is pre-entered. When set to Required there is no default title, and the user must enter a title.

                        Users can set the organizer when booking – (only available for Microsoft 365 Enterprise Application connections). Users can choose a member of your organization to be the meeting’s organizer. The meeting will be created in the member’s calendar and the meeting room will be set as the meeting’s location. When set to Optional the user can book a meeting without selecting an organizer (in which case the booking will be created in the meeting room’s calendar only). If set to Required then the user must choose an organizer.

                        Allow ending meetings – When selected, users are able to end the current meeting directly from the main screen. It is also possible to end upcoming meetings that are starting in the next ten minutes.

                        When ending meetings – There are two options for ending meetings:

                        • Delete the meeting – this will completely remove the meeting from the meeting room’s calendar
                        • Change the meeting finish time – This will bring forward the meeting end time. Note that if this would cause the meeting duration to be less than one minute, it will be deleted instead.

                        Note that this setting does not affect the way that meetings are ended by the check-in feature (see below). Meetings ended due to not being checked in are always deleted.

                        Allow extending meetings – When selected, users are able to extend the current meeting (if the room schedule allows). The meeting may be extended by 15 minutes, 30 minutes, one hour, or two hours.

                        When allowing ending or extending meetings, choosing to allow “only for meetings booked from a MeetingPortal display” restricts ending or extending meetings to only meetings with no organizer, or where the organizer is the conference room.

                        This is usually the case for meetings booked from the MeetingPortal display but can also apply to meetings booked directly in the conference room’s calendar by an admin.

                        Find free rooms – When selected, users are able to search for other free rooms in the building, and also book them (if the Allow Booking setting is enabled).

                        Rooms that are either free now, or will be free in the next ten minutes are included in the list, and the rooms are ordered by the length of time available (with the longest time listed first).

                        Rooms to check – The list of calendars to search when checking for free rooms. You may select as many calendars as you would like.

                        If you do not see all your rooms in the list, make sure that they have been added to your device by following the instructions in Microsoft 365 Setup, Google Workspace Setup, or Android/iOS Setup (depending on which method you are using to connect MeetingPortal to your calendars).

                        Appearance and branding

                        Appearance and branding allows you to customize the appearance of MeetingPortal to match your company branding. You can customize the colors of most elements of the user interface, as well as choose a custom background image and logo for the app.

                        You are able to choose custom colors for the following components:

                        • Background color – The background color of the main display. If you also choose a background image this color will appear behind it.
                        • Text color – The color of text in the main display, and also in dialogs used for booking or finding rooms.
                        • Button color – The color of buttons.
                        • Button border color – The color of the border around buttons. Set this to transparent for no border.
                        • Button text color – The color of the text inside buttons.
                        • Dialog background color – The background color of dialogs used for room booking, meeting details, and room finding.
                        • Room free color – The color used to indicate that the room is currently free.
                        • Room almost booked color – The color used to indicate that the room is currently free, but will be occupied in the next ten minutes.
                        • Room booked color – The color used to indicate that the room is currently occupied.

                        Each of these colors can be tested in the live preview. The booking status of the preview can be changed using the toggle buttons above the main display.

                        MeetingPortal allows you to set a custom background image for the display. This can contain your logo, or other company colors and imagery, and can be used to further personalize the display with your branding.

                        It is recommended that you use an image with the same aspect ratio as your device, but if a different aspect ratio is used then MeetingPortal will scale the image so that the view is always entirely filled.

                        For best results, you should create an image that exactly matches the size of your device’s display in pixels. This ideal size for your device is shown underneath the Background image option.

                        MeetingPortal also allows you to display a custom logo. The chosen logo will appear at the top of the main screen. The ideal image size for a custom logo is 500 x 100 pixels, however you can use an image with a different size and it will be scaled to fit. If you would like to have your logo appear in a different part of the main display you can add it to your background image.

                        Booking and check-in

                        Book your room from the screen, find free rooms close by, and clear unused bookings automatically. Learn how to use MeetingPortal’s advanced features to manage your meeting spaces. All advanced features are optional, so make sure that you have activated and configured them by following the configuration instructions above.

                        Booking

                        The booking controls can be found at the bottom right corner of the main display (for horizontal devices), or at the bottom of the display (for vertical devices). To book the room, tap the button labelled Book now.

                        You will be presented with a booking screen showing four approximate duration: 15 minutes, 30 minutes, 1 hour, and 2 hours. Tap the length of time you would like to book, and a booking will be made with the title “Manually booked”.

                        If you have chosen to allow booking the room in advance, there will also be a button Book a later time. Tapping this button will bring up a calendar display (showing a week on larger devices, or a day on smaller devices).

                        Move the calendar view backwards and forwards in time by pressing the arrow buttons on either side of the dates, or choose a date from the picker by tapping on the month displayed in the center of the screen. To make a booking, tap on an empty space in the schedule, and drag the booking to refine. When you’re done, press the Book button at the bottom of the screen. Note that users are always able to set the title and description of advance bookings, regardless of the value set for Users can set a message when booking in Settings.

                        If the room is currently booked, impromptu booking will be disabled. If future booking is enabled, MeetingPortal will launch the calendar view without showing the impromptu booking screen.

                        Check-in

                        The check-in feature requires all meetings to be manually checked-in when they start. To check-in a meeting, click the Check in button in the current/upcoming meetings section of the main screen.

                        If a meeting is not checked-in within 10 minutes of it starting, it will be automatically ended to free the room for other uses.

                        Extending and ending meetings

                        The current meeting can be extended if there is space in the room’s schedule. To extend a meeting, tap the Extend button in the current/upcoming meetings section of the main screen.

                        You will be presented with a screen similar to the booking screen, showing four durations: 15 minutes, 30 minutes, 1 hour, and 2 hours. Tap the length of time you would like to extend, and the booking will be adjusted.

                        The current meeting can also be ended by tapping the End now button. The meeting will either be removed from your calendar, or edited to end at the current time, depending on the setting you chose for When ending meetings in the settings screen.

                        Find a room

                        Before using this feature, you need to select the calendars you would like to check (see the Rooms to check option in the Configuration settings described above).

                        The free rooms controls can be found at the bottom right corner of the main display (for horizontal devices), or at the bottom of the display (for vertical devices). To find a free room, tap the button labelled Find a room.

                        You will be presented with a booking screen showing all free rooms found. The list is ordered with the rooms having the most free time appearing first. You are able to book your desired room by tapping the corresponding Book now button. To complete your booking, follow the booking instructions above to select your desired amount of time.

                        MeetingPortal Setup Instructions (Android, No MDM)

                        Downloading the APK

                        • First download the up-to-date version of the MeetingPortal app here:

                        https://drive.google.com/drive/folders/13pbK7uDHsXlc9kTsszU2wd6njwS9L8TC?usp=sharing

                        Adding app to the device

                        • Follow the instructions in the video to the left, which we’ve summarized here:
                          1. Follow the instructions for how to open a browser window by swipping down until you can get to settings, then opening a Chrome browswer
                          2. Navigate to this page: www.poetexas.com/meetingportal-manual/#software_update
                          3. Click in the link above.  Accept the warnings to download and install.
                          4. When given the option, accept the new setting to allow Chrome to install an app.  We’ll set it back before the end.
                          5. Install the app.  All of your settings should transfer over, inluding your license.
                          6. Click done, then navigate back to the Advanced Settings in Chrome to turn off the permissions to allow Chrome to install apps.
                          7. Click the square icon on the bottom and swip up unitl MeetingPortal restarts.

                        Reach out to us at success@poetexas.com if you have any questions.

                        Activating the License

                        1. If you don’t have your license key already you should receive it from our customer success team.
                        2. Please send an email with the “MeetingPortal License Key Request” subject to success@poetexas.comIn the interface of the MeetingPortal app press the gear icon to enter the settings.
                        3. Scroll down to the “Subscription” section of the screen, and enter your license key.

                        Uploading the new MeetingPortal app

                        1. Download the new APK from chapter 1.
                        2. Repeat the process from chapter 2.

                        Current version update notes: (MeetingPortal 1.5.20_b588)

                        Gain valuable insights into the way your meeting spaces are being used with our new room analytics feature.

                        Available as part of a Dash Enterprise subscription, room analytics gives you insights into how your spaces are being utilized, how they’re being booked, and how you can increase efficiency in your workplace.

                        We’ve also added support for Microsoft GCC and GCC‑High tenants, the ability to bring up a room’s schedule from the find a free room, and many other fixes and improvements.

                        MDM Provisioning

                        (NOT REQUIRED for non-kiosk devices)

                        Before you start:

                        Android, iOS, and other devices require an MDM system operate in true kiosk mode.  We also recommend an MDM because you can control the devices’ profiles, distribute applications, configure system settings, remotely connect for assistance (on-premise permission required), track their status (battery, geolocation, etc.), and prevent any sort of tampering including in an event of physical theft.

                        If you need an MDM account set up and don’t already have an MDM, you can refer to our MDM Initialization Instructions to learn about a system we recommend.  If you require assistance or have any other questions about an MDM please contact our customer success team.

                        Device Provisioning

                        To provision an MDM Device please accurately follow the steps described in Chapter 4 of the MDM Initialization Instructions or speak to your MDM service provider.

                        MeetingPortal Setup Instructions (Android, ManageEngine, Kiosk)

                        1. Downloading the APK

                        1. First download the up-to-date version of the MeetingPortal app here: 

                        https://drive.google.com/drive/folders/13pbK7uDHsXlc9kTsszU2wd6njwS9L8TC?usp=sharing


                        2. Adding the App to the repository

                        3. Activating the License

                        1. If you don’t have your license key already you should receive it from our customer success team.
                          Please send an email with the “MeetingPortal License Key Request” subject to success@poetexas.com
                        2. Navigate to the “Configurations” tab of the MeetingPortal app in your App Repository
                        3. Locate the “License Key” input field and enter your license key.
                        4. Press the “Save” button at the bottom of the page.

                        4. Modifying the Kiosk Profile

                        1. Navigate to the “Kiosk (Wallstation Android)” profile in Profiles page and click “Modify Profile” as shown below.
                        2. In the next screen click “Continue” and then navigate to the “Kiosk” tab.
                        3. In the “Hidden Apps” field add the MeetingPortal app added in chapter 2.
                        4. Save the profile. You should now have the MeetingPortal app operational alongside the ControlPortal app.

                        5. Uploading new MeetingPortal app versions

                        1. Download the new APK from chapter 1.
                        2. Navigate to the App Repository page and click the “Upload New Version” button as shown to the left.
                        3. In the APK upload dialogue provide the MeetingPortal APK file you downloaded in chapter 1.
                        4. The apps should be updated automatically by the MDM system at the soonest possible opportunity.

                        Accessing ControlPortal

                        1. If you are using an MDM pre-configured Kiosk ControlPortal device it should connect to the Primary ControlPortal Gateway automatically as long as it is on the same LAN and the valid MDM kiosk policy is present (please refer to MDM Initialization Instructions or contact our customer support if you need to get an MDM system set up).
                        2. If you are using an Android Device that is not Kiosk you can access ControlPortal by installing our ControlPortal Android App
                        3. If you are using a device that supports mDNS/Bonjour name resolution (e.g. all Apple products, Windows 10 Build 1511+, some Linux distributions, etc.) you can use http://wallstation.local/ in Chrome or Safari browser to access ControlPortal on the same LAN.
                          • If you are connected to the COR-TAP’s Wi-Fi hotspot use http://wallstationwifi.local/ instead
                        4. If you have a device that doesn’t support mDNS/Bonjour, use http://<primary-gateway-name> (where <primary-gateway-name> is the hostname of your Primary ControlPortal Gateway which you can find in your gateway settings, make sure to replace underscores (_) with dashes (-) if there are any underscores present)

                        If you find this learning center helpful, like and subscribe on your social channels to learn when we post new guides!

                        AT-LED-24V Driver and Light Kits

                        AT-LED-24V Driver and Light Kits

                        Home » Archives for Anthony Garza

                        AT-LED-24V Installation and Configuration Manual

                        Welcome to the PoE Texas Manual for the AT-LED-24V, AT-LED-24V-STRIP, AT-LED-24V-DISC, AT-LED-24V-BULB, AT-LED-24V-COB line of products!

                        The purpose of the manual is to help you quickly and effectively install and configure your new AT-LED-24V  kit.

                        Our goal is to make our products as intuitive and simple to use as possible, so we value your feedback and questions directly to us at service@poetexas.com.  Phone +1-512-479-0317.

                        Or you’re always welcome to leave questions or comments on our product pages: AT-LED-24V.

                        What’s Inside

                        PARTS LIST: AT-LED-DRIVER

                        • AT-LED-24V PoE to LED driver
                        PARTS LIST: AT-LED-24V-STRIPS

                        • AT-LED-24V PoE to LED Driver
                        • 1 x AT-WS-1 Wireless wall switch
                        • 1 x 2.2m 3200K LED Light Strip
                        PARTS LIST: AT-LED-24V-BULBS

                        • AT-LED-24V PoE to LED Driver
                        • 1 x AT-WS-1 Wireless wall switch
                        • 3 x 2700K LED Light Bulbs
                        • 2 x wire connectors
                        PARTS LIST: AT-LED-24V-DISC

                        • AT-LED-24V PoE to LED Driver
                        • 1 x AT-WS-1 Wireless wall switch
                        • 2 x 6500K LED Disc Lights
                        • 2 x wire connectors
                        Parts Lists: AT-LED-24V-COB

                      • 1x RGB strip with remote
                      • 1 x PoE+ driver
                      • 1x wireless/battery-free light switch
                      • Accessories and Tools

                        Not Included in Base Kit

                        REQUIRED ACCESSORIES:

                        • Cat6 Ethernet  (2 cables length < 100m)
                        • Single Gang JBOX or low voltage wall ring
                        • Wire strippers

                        DRAWING SETS

                        Download the Kit Drawing Set

                        Kit Includes
                        1 x 24V LED driver

                        1 x 2.2m 24V 3200K LED strip

                        1 x Battery-free Wireless Toggle Light Switch

                        500 Sqft Space

                        Kit Includes
                        1 x 24V LED driver

                        2 x 6500K LED Disc lights

                        1 x Battery-free Wireless Toggle Light Switch

                        500 Sqft Space

                        Kit Includes
                        1 x 24V LED driver

                        3 x 2700K LED BULBS

                        1 x Battery-free Wireless Toggle Light Switch

                        500 Sqft Space

                        1 x AT-LED-24V

                        1 x AT-WS-S1

                        1 x RGB Strip

                        1 x RGB Controller

                        1 x RGB Remote

                        MOUNTING INSTRUCTIONS

                        • Before you mount anything, make sure you pair your light switch or multiple light switches with the AT-LED-24V driver.  See instructions here.
                        • If mounting the light switch for flush mounting, identify the light switch mounting location and cut and mount a low voltage ring.
                        • Otherwise, simply use the adhesive strip to mount the light switch on a wall.

                        Did you know the light switch will come right out of the mount so you can carry it around?

                        • The AT-LED-24V can fit into a standard ceiling electrical box, but, as a low voltage device it does not need an enclosure.
                        • Pull the PoE+ Ethernet line to the mounting location and connect to the AT-LED-24V.
                        • Now’s a great time to make sure you’ve paired your light switch to the LED drivers you’d like to control.
                        • Wire up the light fixture or fixtures.
                        • Test  your light switch toggles the lights on/off

                        Troubleshooting

                        • My lights don’t turn on:
                          • Make sure the amber light on the AT-LED-24V is on so you know it’s receiving power
                          • Double check you have not wired the lights backward.  This happens most often with the LED bulb kits
                        • My lights come on, but they’ll randomly shut off
                          • Double check you have a PoE+ switch.  Ports will drop out if you have a 12 watt PoE switch
                          • Make sure the total power budget on the PoE switch can support the full load of lights you’ve connected to it.  Want to learn more?
                        • What happens when the power goes off and comes back on again?
                          • The AT-LED-24V is designed to boot to “on”, so if your lights loose power then they’ll turn on again when power is restored.

                        PROGRAMMING AND CONFIGURATION

                        PAIRING LIGHT SWITCH TO DRIVER: Make sure to pair your light switch to the AT-LED-24V after it is powered on but before you install in an enclosure or somewhere inaccessible.  The amber LED will be on, and the green LED will start off.  Press the AT-LED-24V button for 4-5 seconds.  The green light will turn on, then turn off.  Once the light is off, the AT-LED-24V is in pairing mode, then press the light switch. When the green led flashes 2 times, it means the pairing has been successful. Each AT-LED-24V can pair with up to 42 switches.

                        UNPAIRING: Press the AT-LED-24V for 10 seconds, the green LED will turn on, then turn off, then flash 4 times. It means the AT-LED-24V is in factory setting mode.  All pairings have been removed.

                        You may consider doing a preliminary wiring before installing the fixtures to sync the light switch.

                        Technical Specifications

                        If you find this learning center helpful, like and subscribe on your social channels to learn when we post new guides!

                        BT-1-WM and Kits

                        BT-1-WM and Kits

                        Home » Archives for Anthony Garza

                        BT-1-WM, BT-1-56V120W, BT-3-48V240W, BT-6-48V480W

                        Welcome to the PoE Texas Manual for the BT-1-WM, BT-3-48V240W, and BT-6-48V480W that cost-effectively upgrades any non-PoE or PoE port to IEEE 802.3bt and 90 watts!

                        The purpose of the manual is to help you quickly and effectively navigate the installation and functions of your new Power Over Ethernet Midspan.

                        Our goal is to make our products as intuitive and simple to use as possible, so we value your feedback and questions directly to us at success@poetexas.com.  Phone +1-512-479-0317.

                        Or you’re always welcome to leave questions or comments on our product pages: BT-1-56V120W, BT-3-48V240W, BT-6-48V480W

                        What’s Inside

                        BT-1-WM

                        PARTS LIST:

                        • 1 X Midspan Injector
                        • Din Rail Mounting Brackets


                        Additional items you’ll need not included:

                        1 – DIN rail

                        2 – Patch cables to the switch and home run cables to the device.

                        https://shop.poetexas.com/collections/tools-and-accessories

                        3 – Network Switch

                        https://shop.poetexas.com/products/gbts-28-24-m?variant=40620339986591


                        BT-1-56v120w

                        PARTS LIST:

                        • 1 X Midspan Injector
                        • Din Rail Mounting Bracket and Screws
                        • 56V 120W Power Supply 

                        Additional items you’ll need not included:

                        1 – DIN rail

                        2 – Patch cables to the switch and home run cables to the device

                        https://shop.poetexas.com/collections/tools-and-accessories

                        3 – Network Switch

                        https://shop.poetexas.com/products/gbts-28-24-m?variant=40620339986591


                        BT-3-48V240W

                        PARTS LIST:

                        • 1 X Midspan Injector
                        • Din Rail Mounting Bracket and Screws
                        • 1 X 48V 240W Power Supply (Adjustable up to 56 volts)
                        • 1 X 3 Pronged AC Cable

                        Additional items you’ll need not included:

                        1 – Patch cables to the switch and home run cables to the device

                        https://shop.poetexas.com/collections/tools-and-accessories

                        3 – Network Switch

                        https://shop.poetexas.com/products/gbts-28-24-m?variant=40620339986591


                        BT-6-48V480W

                        PARTS LIST:

                        • 1 X Midspan Injector
                        • Din Rail Mounting Bracket and Screws
                        • 1 X 48V 480W Power Supply (Adjustable up to 56 volts)
                        • 1 X 3 Pronged AC Cable


                        Additional items you’ll need not included:

                        1 – Patch cables to the switch and home run cables to the device

                        https://shop.poetexas.com/collections/tools-and-accessories

                        3 – Network Switch

                        https://shop.poetexas.com/products/gbts-28-24-m?variant=40620339986591


                        General Installation

                        A midspan like the BT-1-WM and its kit variations are simple to add on to a network port, and the purpose is to add PoE using a wide range of input power to any network.

                        With this DIN rail-mounted device, simply mount it on a DIN rail near the networking switch you’d like to pair it with.  Then, use a short Ethernet patch cable from the switch’s data port to the LAN port on the PoE midspan. The POE port adjacent to the LAN port will now have that IEEE 802.3bt (95 watts) power budget and up to 2.5 gigabit pass through data.  Finally, connect the DC power supply to the Phoenix style connector on the top.

                        The BT-1-WM also passes grounding through the RJ-45 ports to provide some protection in an ESD event.  However, we recommend only grounding devices at one location, so the kits do not come grounded themselves.

                        Not sure what grounding is?  Panduit has some great graphics around grounding.

                        CONFIGURATION

                        There is no configuration necessary with this device.  Simply plug it in.

                        • The amber LED indicates power on and ready to negotiate PoE.  
                        • The green LED indicates that the device has negotiated PoE with a Powered Device (PD).

                         STEPS TO TROUBLESHOOT:

                        1 – At the injector, disconnect the PoE port from your device.  Use a PoE Tester to confirm the device is able to power on using a short jumper cable.

                        2 – At the other end of the network cable to your device, disconnect the device and use the PoE Tester to confirm it is able to negotiate PoE.

                        3 – Connect the PoE Tester to the end device to monitor power consumption. 

                        If you’re able to power on the device with the PoE Tester inline, it’s likely a compatibility issue.  Please contact us at success@poetexas.com to find you the right solution.

                        Technical Specifications

                        Product Specifications

                        Certifications CE/FCC/RoHS ; UL Rating with Power Supply Kits
                        Data + PoE Ports 1
                        Data Ports 1
                        Data Rate 2.5 Gigabit
                        DC connector 5.5×2.1 Coaxial ; 18 AWG Push In
                        Display Type LED – Amber (PoE Available) ; Green (PoE Negotiated)
                        IEC Protection Class IP 40
                        Max Current 1.61 Amps
                        Max Power for Kit Varies based on the kitted power supply
                        Max Voltage 56 volts
                        Mount Type Wall ; DIN
                        Operating Humidity 20% to 80%
                        Operating Temperature Range 0 – 50C
                        Output Voltage 56 volts
                        PoE Method IEEE 802.3af, IEEE 802.3at, IEEE 802.3bt
                        PoE Mode/Pinout Mode A (-1,2 +3,6)/Mode B (+4,5 -7,8)

                        If you find this learning center helpful, like and subscribe on your social channels to learn when we post new guides!

                        AF-RLY-8

                        AF-RLY-8

                        AF-RLY-8 The PoE Enabled Relay Controller for Smart Buildings

                        Welcome to the PoE Texas Manual for the 8 channel smart relay managed online using PoE!

                        The purpose of the manual is to help you quickly and effectively navigate the installation and functions of your new Power Over Ethernet Controller.

                        Our goal is to make our products as intuitive and simple to use as possible, so we value your feedback and questions directly to us at service@poetexas.com.  Phone +1-512-479-0317.

                        Or you’re always welcome to leave questions or comments on our product page: AF-RLY-8

                        What’s Inside

                        PARTS LIST:

                        • 1 X POE Relay Controller
                        • 1 X DC Power Cable (12/24 VDC or 12/24 VAC)
                        • 8 X Input terminating resistors (219 Ohm)
                        • 8 X Input bridging diodes

                        The resistors and diodes are not used often for terminating inputs.


                        GENERAL INSTALLATION


                        Your new PoE relay is designed for either wall mounting or DIN rail mouting.  Simply select your location and either mount the DIN rail or use four screws (not included) to mount the relay controller.

                        Once it is in place, you’re ready for wiring.

                        Wiring Diagram

                        CONFIGURATION

                        Technical Specifications

                        Product Specifications

                        Adapter length 6.5 inches
                        Cable connectors RJ45 Female
                        Certifications CE, RoHS
                        Data Rate 10/100 Mbps
                        Dimensions 7x3.625x1.625 in.
                        Input voltage 44 to 56 volts, 24 VDC, 120 VAC, or 240 VAC
                        LED Indicator Red - Power On, Green - Connection, Amber - Activity
                        LEDs Per Port 2
                        Load Regulation 10 amp Relay
                        Max Current 10 amp
                        Operating Humidity 5% to 90%
                        Operating Temperature Range -10 - 60C
                        PoE Mode/Pinout Mode A (-1,2 +3,6)
                        PoE Standard IEEE 802.3af
                        Standard and Protocols MQTT, SSH
                        Weight 1 lb

                        If you find this learning center helpful, like and subscribe on your social channels to learn when we post new guides!

                        GAT-50V30W and GPOE-24V30W

                        GAT-50V30W and GPOE-24V30W

                        Home » Archives for Anthony Garza

                        Installation Manual for

                        GAT-50V30W and GPOE-24V30W

                        Welcome to the PoE Texas Manual for the GAT and GPOE Line of PoE+ Adapters!

                        The purpose of the manual is to help you quickly and effectively navigate the installation and functions of your new Power Over Ethernet Adapter.

                        Our goal is to make our products as intuitive and simple to use as possible, so we value your feedback and questions directly to us at service@poetexas.com.  Phone +1-512-479-0317.

                        Or you’re always welcome to leave questions or comments on our product pages: GAT-50V30W and GPOE-24V30W.

                        This manual has been revised to reflect the new functions of the GAT-50v30w-Rev2.

                        What’s Inside

                        PARTS LIST: GAT-50V30W

                        • 1 X POE CONVERTER
                        Yep, that’s right.  No separate cables or missing parts.  Everything is here. If you want, you could pick up a DC wire to 2.1 mm jack from Amazon, like these.

                          PARTS LIST: GPOE-24V30W

                          • 1 X POE CONVERTER
                          Yep, that’s right.  No separate cables or missing parts.  Everything is here. If you want, you could pick up a DC wire to 2.1 mm jack from Amazon, like these.

                            General Installation

                            Your new PoE injector is designed to be simple to install and set up.  It comes with mounting screw tabs for a #4 wood screw (sold separately) which allows you to mount it easily on plywood or on DIN rail brackets. 

                            Once it is in place, simply plug the RJ-45 end into an IEEE 802.3at PoE or 12-60 volt passive Power Sourcing Equipment (PSE) with a data source, and the other end into your device such as a camera, tablet, or any compatible device. 

                            That’s it! Your device is now receiving a steady stream of 24V Power and Data to your end device.

                            CONFIGURATION

                            Technical Specifications

                            Product Specifications (GAT-50v30w)

                            Adapters included See Variation Options
                            Certifications RoHS, CE, FCC
                            Data + PoE Ports

                            1 (Output)

                            2 (Input) (optional)

                            Data Ports 1 (Input) (0ptional)
                            Data Rate 2.5 Gbps
                            DC connector 5.5 x 2.1 mm DC Female
                            Dimensions 4.5 x 2 x 1 in
                            Efficiency 90%
                            Input voltage 12 to 50 volts/ 24 V Passive PoE
                            Max Current 4,000 mA
                            Max Power for Kit 30 Watts
                            Operating Humidity 10 -90% non condensing
                            Operating Temperature Range 0 – 40C
                            Output Voltage 50 Volts
                            PoE Mode/Pinout Mode A/B
                            PoE Standard IEEE 802.3at
                            Weight 3.0 oz

                            Product Specifications (GPOE-24v30w)

                            Adapters included See Variation Options
                            Certifications RoHS, CE, FCC
                            Data + PoE Ports 1 (Output)
                            Data Ports 1 (Input)
                            Data Rate 2.5 Gbps
                            DC connector 5.5 x 2.1 mm DC Female
                            Dimensions 4.5 x 2 x 1 in
                            Efficiency 90%
                            Input voltage 12 to 50 volts
                            Max Current 4,000 mA
                            Max Power for Kit 30 Watts
                            Operating Humidity 10 -90% non condensing
                            Operating Temperature Range 0 – 40C
                            Output Voltage 24 volts
                            PoE Mode/Pinout Mode A/B
                            PoE Standard 24 Volt Passive PoE
                            Weight 3.0 oz

                            If you find this learning center helpful, like and subscribe on your social channels to learn when we post new guides!

                            AC-USBC; AC-USBC2

                            AC-USBC; AC-USBC2

                            Home » Archives for Anthony Garza

                            AC-USBC 100 to 240V AC to USB-C Converter

                            PoE to USB-C

                            What’s Inside

                            PARTS LIST: AC-USBC

                            • 1 X AC to USBC Converter
                            • 2 X Wire Nuts

                            The AC-USBC comes with a male USB-C connector and an RJ-45 Connector.

                            PARTS LIST: AC-USBC2

                            • 1 X AC to USBC Converter
                            • 2 X Wire Nuts

                            The AC-USBC comes with a male USB-C connector and an RJ-45 Connector.

                            General Installation

                            Your new USBC converter is designed to be simple to install and set up.  It is small and compact enough to standard wall gang and European wall boxes.

                            An adhesive or screw anchor is sufficient to hang the adapter on a wall, enclosure or wall gang box.

                            1. First make sure power is disconnected to your AC port by flipping the appropriate breaker switch.
                            2. Once the power is off, use a volt meter to ensure power has been disconnected.
                            3. Connect the black(line) wire to the black(line) wire nut on the AC-USBC. Then connect the white(neutral) wire to the white(neutral) wire nut on the AC-USBC.
                            4. Once Connected and tucked in place or mounted, test for power by flipping the breaker and using the volt meter.
                            5. Once Voltage is established, you can plug in your USBC device and you will have perfectly safe power converted for your low voltage devices. 

                            Please note that this device does not operate with Power and DATA. The Device Power profiles are 5v 3amp, 9v 3amp, 12v 2.5amp,15v 2 amp, 20v 1.5amp 

                            I Want Power and/or Data for my iPad Air, Samsung Tab, or a Power Delivery Device!

                            Visit Our Full Line of Power Delivery Compatible Devices

                            CONFIGURATION

                            There is no configuration necessary with this device.  Simply plug it in.

                            Technical Specifications

                            Product Specifications

                            Cable connector length 5 inches
                            Cable connectors Wire Nuts, USB-C female
                            Data + PoE Ports 0 (input)
                            Data Ports

                            0

                            Data Rate
                            Connector USB-C Male
                            Dimensions 2.5x2x1 in.
                            Input voltage 100 volts to 240 volts
                            Max. Amps Per Port 3
                            Operating Humidity 5% to 90%
                            Operating Temperature Range -10 to 60°C
                            Output Voltage 5 volts, 9V, 12V, 15V, 20V
                            PoE Method N/A
                            PoE Mode/Pinout 0
                            Power Input Negative and Positive wires
                            Weight 1 oz

                            If you find this learning center helpful, like and subscribe on your social channels to learn when we post new guides!

                            What is PoE?

                            What is PoE?

                            Home » Archives for Anthony Garza
                            I’ll start by saying that I love Power Over Ethernet (PoE). 

                            Yeah, yeah, it’s what I do for a living, but, really, how cool is it that you can take the ethernet cable you have in your wall and get it to power up cameras, iPads, or even TV’s?  I see PoE as Potential (okay, yeah, I couldn’t resist the nerd joke, and be forewarned they keep coming).

                            In all seriousness, though, Power Over Ethernet can save you 30% on any given project where you would otherwise have to call a licensed electrician out to pull a permit just to put an outlet somewhere so you can hang a camera.  Even better, because PoE runs  on low voltage power (less than 56 volts) you can safely do the work yourself, or at least get your techie nephew to do it. 

                             If it’s so cool, why doesn’t everyone do this all the time?  Frankly I’m stumped.  However, I blame it on it sounding too technical because it has to do with computers talking to each other.

                            That ends today. I help a lot of people find the right PoE solution, and believe me when I say you can understand PoE. Once you have a few basic terms and principles, you’ll blow minds! To make that magic happen for you I will simplify Power Over Ethernet (PoE) in an easy to understand way even if you’ve never worked on a network before.

                            PoE is Smarter Power

                            Introduce yourself to What PoE is and Why you would benefit from pushing your business towards the future.

                            Let’s start off with a pronunciation guide.

                            This is worth your time. You drop this on your friends and coworkers, and you become the de facto expert on PoE.
                            • PoE – pronounced PEE – OH – EEE.  Not like Edgar Allan “Poe”.
                            • IEEE 802.3af – pronounced EYE TRIPLE EEEE EIGHT OH TWO DOT THREE AYE EF.
                            • Okay, so say it with me now . . .  EYE TRIPLE EEEE EIGHT OH TWO DOT THREE AYE EF.
                            Great work!!

                            So what does that all mean?

                            Working from the ground up (another engineer joke!), PoE means putting electricity onto an ethernet cable along with a data signal.  You can use that electricity to power all kinds of things: cameras, lights, wifi access points, iPads, phones, TV’s, computers, media players, Raspberry Pi’s.  Warning: once you get into what you can power with PoE, it goes deep, like X-Files deep. 

                            Oh, about the IEEE thing (yeah, you heard how cool you sound saying it).  Simply put, you have a very smart guy making cameras and you have another smart guy like me – ahem, why thank you – making devices that can power those devices over a network cable.  To make sure we all work together without having to constantly fight over things, we called our friends at the Institute of Electrical and Electronics Engineers (IEEE – “EYE TRIPLE EEE”) and asked them to help us create a standard way of doing things.  They agreed and added us to the 802nd section part three subsection “af” of their standard. 

                            You don’t need to read it, but if you do – SPOILER ALERT – data and power get together by the end. 

                            That standard is how engineers agree how the PoE will work, so we both make devices that talk the same PoE.  As time passed we kept coming up with better and better ideas, like MORE POWER!  So now we have a few more standards.  Here’s a table of the PoE standards as they stand today (don’t worry, I will explain it all so just bask in the glory of it):

                            The Current PoE Types and Standards

                            PoE Type or Standard Nickname Power Per Port
                            (at the device)
                            Types of Devices
                            IEEE 802.3af PoE 12.9 watts
                            IP Cameras
                            IP phones
                            iPads and Tablets
                            (<10″)
                            IEEE 802.3at PoE+ 25.5 watts
                            Outdoor PTZ Cameras
                            Dual Radio Wifi Access Points
                            USB Type C phones and tablets
                            (>10″)
                            IEEE 802.3bt PoE++
                            4Pair PoE
                            79 watts
                            Televisions
                            Lights
                            Blinds
                            Laptops
                            *Passive PoE 24 Volt PoE
                            Passive
                            Up to 55 watts
                            Ubiquiti or Mikrotik
                            Wireless Internet PtP or PtMP
                            (big Wifi Radios)

                            *Passive PoE can operate anywhere from 12 volts up to 58 volts.

                            You’ll want to check your specifications carefully to make sure they match your device.

                            Have no fear! You can use a device called a PoE Splitter to change PoE into almost any kind of power you need: USB, 12 volt DC, 19 volt DC, USB Type C.  So find out what kind of power you need, then get a splitter for it.
                            The real difference between the types of PoE is how much power your devices need which is called out in Watts.  What you need to know is that the watts are how much power a device consumes to do its job.  The last column shows you the kind of devices each power level can support.
                             
                            And  that, my friends, is all you need to know.  Seriously.  When it’s all said and done, you just need to make sure you pick a Powered Device (PD) like a camera or media controller that matches the standard of the Power Sourcing Equipment (PSE).  You like how I snuck . . . sneeked . . . er . . . snooked some more vocabulary in there?
                             
                            “But how do I do that?” you ask.  I’ll break it down bullet point style.  Let’s say you’re looking to add a new camera or any device to your network.
                            • First, go find the datasheet.  Don’t Panic.  Every engineer makes a datasheet because its their way of bragging.  It’s like they’re street racers with their tricked-out muscle cars, they want you to know what they’ve got under the hood.  Typically, you can find PoE in the Electrical section.  You’ll find something like “POE” or “IEEE 802.3 af”.  That tells you what kind of PoE your new toy has.
                            • Second, select a type of Power Sourcing Equipment (PoE), that’s your PoE switch or midspan (injector).  What’s a switch and what’s a midspan you ask?  They look a lot alike, but don’t be fooled.  They’re different animals with different purposes like a king snake and a coral snake (Krykie, she’s a beauty!  I’m going to pick her up!).

                            Why use a Midspan when I can just buy a PoE switch?

                            There are two situations where a midspan injector makes more sense:
                            1.  Let’s say you have your network all set up, and it’s working great. All the ports are forwarding, Quality of Service (QoS) is great, and everything has been working for a while. If you’re like me, the guy who set up the network has gone all Jason Bourne on me which means I’ll never find him again. Then you need to add PoE to it, or you need to add PoE+ to your PoE switch because you just need that little extra power. Do I really want to try to pull out that switch that I paid a lot of money and headache to get configured to add a few PoE+ devices? At this point, it’s not about the money, it’s about the headache of nothing working for a month while we get it all sorted out again. Or do I just add a midspan in a few minutes and forget about it.
                            2. You don’t want to have to buy a switch that doesn’t have the features you want just because it can do the PoE you want. We see this more often than you’d think. For example, you have an NDI switch that doesn’t have PoE or doesn’t do PoE+. You need that PoE power for your streaming camera. Do you buy an NDI switch that may be way more than you need with PoE+ or just use a midspan to add it to the switch you know and love?
                            • Finally, once you know your switch or midspan is compatible, then make sure you have enough ports and power budget for all your PoE devices on your PSE. Most switches and some midspans don’t have enough total power budget to give you full PoE power on all ports at the same time.  Why?! you may ask. It comes down to cost and how much you’ll really use each port. Your Toyota Corolla technically can go to 120 mph, but you really use it to get to work and back. If you really wanted to go 120 mph, you upgrade a Porsche or Corvette or something truly awesome.   

                            There’s a catch . . . this part takes . . . gasp . . . math.  I know you swore you would never touch a calculator again when you got out of school.  Believe me.  It’s not that bad.

                            Simple Method:

                            Add up all the rated power consumption of all the devices and compare it to the rated power of your PSE.  For example:
                            2 x PTZ Optics cameras at 12 watts each = 24 watts
                            2 x Polycom Phones at 6 watts each = 12 watts
                            1 x High End Wifi Access Point (WAP) = 23 watts
                            All together: 24 + 12 + 23 = 59 watts
                             
                            You need at least 5 ports and a total of 60 watts.  Oh, and by the way, you need PoE+ for that high end WAP.

                            Nerdy Method:

                            I couldn’t leave you with it that simple.  If you’d really like to get details, you can use our PoE Calculator to estimate how much you can expect in cable loss as well!


                            Now you can find our APP for Apple and Android devices!

                            *Passive PoE can operate anywhere from 12 volts up to 58 volts.

                            You’ll want to check your specifications carefully to make sure they match your device.

                            PoE Specifier's Guide

                            E voila!  That covered what you need to know.  You now know more than 90% of people in the world about Power Over Ethernet.  With this simple set of tools you’ll shock yourself (please only figuratively) with what you can accomplish and how easily it will happen. Put that 30% into a new rocking set of drums or your kid’s college fund, whatever you think is most important. Whether you decide to tackle a project yourself or hire someone else, you now have the core knowledge you need to handle a Power Over Ethernet project.
                             
                            I will close with the immortal words of Stan Lee, “With great power comes great responsibility”.

                            If you find this learning center helpful, like and subscribe to our social channels to learn when we post new guides!

                            PoE Lighting Drives Costs Down

                            PoE Lighting Drives Costs Down

                            Resorts World Confirms PoE Lighting Costs Less

                            Independent Study Confirms PoE Texas’ Denton DBI Costs Less Than Traditional AC


                            Resorts World and its electrical contractor have finally answered the most important question facing PoE lighting and automation. Can a Power Over Ethernet lighting system compete in price with what gets installed today?

                            They performed an exhaustive, electrical contractor-led analysis of the total costs comparing a managed lighting system using PoE to an unmanaged traditional AC lighting installation, and the results stunned them. 

                            Denton DBI Savings 

                            Their analysis says yes, a PoE Texas-managed solution costs less than traditional AC even without controls. They were so impressed with the results, they agreed to make them public.

                            Open Floor Plan Convention Area:

                            • Monochromatic downlights
                            • Grid-based lighting
                            • and Channel Lighting
                            PoE Lighting Capex Savings

                            Bid My Job

                            click here for a quote

                            Schedule a One on One with our CTO!

                            The Comparison

                            As the basis for comparison, the light control system for the AC solution included standard dimming while the PoE solution included customized group controls provided by Electronic Theater Control (ETC) touchscreens. Conspicuously excluded from the estimated results is the specified ETC which would have increased the AC overall price by $100,000.

                            In the cost analysis, the quote comparison shows an overall reduction in material cost when utilizing PoE, due to:

                            • Exclusion of steel conduit
                            • Reduced copper wire
                            • Fewer circuit panels

                            Equivalent Performance

                            In the technical analysis, PoE outperformed the comparable High-Voltage system in lumen to power efficiency due to PoE’s control fidelity. At a lower price point PoE allows the end user to easily manage each fixture individually or control them collectively in a group setting with precision not cost-effectively available for a basic AC solution.

                            In summary,the traditional AC hardware and material priced at $129,000 vs. PoE at $97,000. The cost of labor increases when installing PoE because each fixture requires individual addressing and programming, resulting in higher labor costs.

                            This raised the labor cost for PoE to $104,000, while traditional AC was at $99,000. Regardless, in total, the final cost for a lighting installation using Traditional AC Power came to $274,984, while PoE only cost $240,656.58.

                            PoE Lighting Capex Savings

                            Concluding the Study

                            In the final analysis, the integration of PoE controls far exceeded the basic savings as it met theatrical standards without any additional expense resulting in savings far beyond 15%. With a true control system comparison, PoE Texas saves more than $134,000. This study highlights that PoE, and PoE Texas’ Denton Digital Building Intelligence (DBI) in particular, delivers a significant cost advantage with built-in controls, material cost reduction, automation capabilities, and lack of integration expenses over even basic traditional AC systems.

                            Resorts World discovered they could have a fully managed lighting system for less than the cost of their basic lighting package.

                            example of poe lighting and restaura